These are the real reason I made that toffee. ;)
They disappeared before I had a chance to take a photo... guess that's just an excuse to make more!
About 5 1/2 Dozen Cookies
Ingredients:
1 1/2 cups rolled oats
2 1/2 cups unbleached all-purpose flour
1 tsp. baking powder
1 tsp. baking soda
1 tsp. salt
1 cup butter
1 cup packed light brown sugar
1/2 cup sugar
3 tbsp. shortening
2 eggs
1 tsp. vanilla extract
1 1/2 cups chopped walnuts
3/4 cup semi-sweet chocolate chips
3/4 cup milk chocolate chips
3/4 cup toffee bits
Method:
Preheat oven to 350 F.
1. Pulse the oats in the food processor until finely ground. Whisk the oats with the flour, baking powder, baking soda, and salt in a medium bowl.
2. Beat the butter, brown sugar, sugar, and shortening in the bowl of a stand mixer at medium speed for 2 minutes (or until blended). Beat in the eggs and vanilla. Reduce the mixer to low speed and beat in the flour mixture. Stir in the nuts, chocolate, and toffee bits.
3. Scoop tablespoons of the batter onto a parchment-lined baking sheet. Flatten to ~1/2-inch thick. Bake 10-12 minutes or until golden brown.
Reference:
Chocolate Brickle Cookies from Cooking Pleasures magazine (unfortunately I forgot to write down the date before ripping it out of the magazine so I'm not sure which issue this was from...)
Showing posts with label Cookies. Show all posts
Showing posts with label Cookies. Show all posts
Friday, July 31, 2009
Friday, June 26, 2009
Chocolate-Raspberry Cookies
So chewy! So chocolatey! So free of rubbish you shouldn't be eating! All this and vegan, too!
These are really fantastic cookies. I can't wait to make them again with different flavours of spreadable fruit (cherry, apricot, orange marmalade with Grand Marnier or Cointreau... whatever!)
I may even add some chocolate chips or chopped nuts next time but, really, they wouldn't need them.
I didn't take a photo since my camera just landed in Texas but these cookies look remarkably like these ones: Double-Chocolate Peppermint Cookies
Makes about 2 dozen cookies
Ingredients:
1/2 cup raspberry preserves
1 cup unrefined sugar
1/3 cup canola oil
1 tsp. pure vanilla extract
1 tsp. pure almond extract (or amaretto)
1/4-1/2 tsp. Chambord (optional)
1/2 cup plus 2 tbsp. unsweetened cocoa powder
1 1/2 cups unbleached all-purpose flour
3/4 tsp. baking soda
1/4 tsp. salt
Method:
Preheat oven to 350 degrees.
1. In a large mixing bowl, combine the raspberry preserves, sugar, canola oil, vanilla, almond extract or amaretto, and Chambord.
2. In a separate mixing bowl, sift the flour, cocoa, baking soda, and salt together. Add the dry ingredients to the wet in three batches, mixing well with each addition. You may need to use your hands to kneed the dough with the last addition.
3. Roll the dough into walnut-sized balls and then flatten them with your hands into discs. Place them on a prepared cookie sheet and bake for 10 minutes. They don't spread so don't worry about placing them far apart on the sheet.
4. Remove from the oven and let the cookies cool for 5 minutes on the sheet and then transfer them to a cooling rack to cool them completely.
Reference:
Chewy Chocolate-Raspberry Cookies from Veganomicon.
The only change I really made was to add Chambord and a little amaretto when I ran out of almond extract (!) :)
I can't wait to try different flavours of these cookies!
Sunday, January 18, 2009
Lower-Sugar Cookies

These were surprisingly very tasty. Unlike the first recipe I tried (that I found on a popular recipe website), these did not have a nasty Splenda after-taste. After that un-presentable disaster, I decided to modify a tried-and-true recipe to make them lower in sugar for a diabetic family member.
This version is also vegan but you can make them non-vegan by subbing in 1/2 cup (1 stick) butter for the non-dairy Earth Balance and 1 egg for the Ener-G substitute.
Makes about 30 cookies
Ingredients:
1 cup all-purpose flour
1/2 tsp. baking powder
1/2 tsp. salt
1 cup rolled oats
1/2 cup Earth Balance non-dairy spread
1/4 cup agave nectar (lower glycemic index than regular sugar)
1/4 cup Splenda Brown Sugar Blend
1 1/2 tsp. Ener-G egg replacer
2 tbsp. water
1/2 tsp. vanilla extract
2 cups semi-sweet chocolate chips
1/2 tsp. ground cinnamon
Method:
Preheat oven to 350 degrees. Line cookie sheets with parchment paper.
1. In a large bowl, combine the flour, baking powder, salt, oatmeal, and cinnamon. Stir well to mix. Whisk together the water and Ener-G powder until combined and slightly thickened.
2. In the bowl of a stand mixer fitted with the paddle attachment, beat together the Earth Balance, agave nectar, and brown sugar substitute until well mixed. Beat in the Ener-G mixture and the vanilla.
3. Lower the mixer speed and beat in the flour and oatmeal mixture. Add in the chocolate chips.
4. Drop tablespoons of the batter on the prepared pans. Flatten the mounds with the back of a fork.
5. Bake 12-15 minutes or until they spread and color evenly and become firm. Cool on wire racks and then store in an air-tight container.
Reference:
Based on the Chewy Oatmeal Raisin Cookies recipe from the book Cookies Unlimited by Nick Malgieri.
That's more like it...
Remember my failed attempt at thumbprint cookies with the candy cane Hershey Kisses? Well, after figuring out how to actually make thumbprint cookies, I had another go at them later that week. The results were much better! :)
(I just can't believe it took me this long to blog the new photo!)

(I just can't believe it took me this long to blog the new photo!)

Thursday, December 18, 2008
Twinkle, Twinkle

Confession: I'm not much of a sugar cookie fan. They're just a bit boring generally. I do love this recipe that I found on Annie's blog last year - the almond extract really adds that necessary little je ne c'est quoi :)
These are another great option for people who are bored with basic sugar cookies. The cardamom adds a lovely almost flowery taste. It's also quickly becoming one of my new favourite kitchen scents. I kept wafting the bottle under my nose as I was making the dough for these.
I found these to be rather reminiscent of lavender shortbread. Yum!
Cardamom Sugar Stars
Yield: About 3 dozen cookies
Ingredients:
Cookies ~
1 7/8 cup unbleached all-purpose flour (yes, I halved the original recipe and ended up with a wonky amount. Could have been worse...)
1/2 tsp. baking powder
1/4 tsp. salt
1 cup granulated sugar
1/2 cup unsalted butter, softened (room temp)
1/2 tsp. ground cardamom
1 egg
1/2 tbsp. vanilla extract (no, that's not a typo! It should be 1/2 tablespoon)
Spice Mixture ~
1/8 cup sugar or sparkling sugar (see note below)
1/8 tsp. ground cardamom
Method:
*Note: You will need to refrigerate the dough overnight so keep that in mind before starting these.
1. Whisk together the flour, baking powder, and salt in a medium-sized mixing bowl.
2. Cream the butter, 1 cup sugar, and 1/2 tsp. cardamom in a large bowl. Beat in the egg and vanilla then mix in the flour mixture until it is just blended. Knead the dough by hand just until it is smooth. Divide the dough into two pieces; shape into flat rounds. Cover the rounds and refrigerate until firm enough to roll (overnight or up to two days).
3. Preheat oven to 350 degrees. Line baking sheets with parchment paper. Remove the dough from the refrigerator (one round at a time) and let it stand at room temperature until it is soft enough to roll but still firm. Roll the dough between two pieces of parchment paper to about 1/8-inch thickness. If the dough gets too soft at any time, you can return it to the fridge until it's firm.
4. Use a star-shaped cookie cutter to cut out the dough (it's helpful to dip the cutter in flour to help prevent sticking). Reroll leftover scraps. Repeat with remaining dough.
5. Combine all the spice mixture ingredients in a small bowl and sprinkle over the cookies. Bake 8-10 minutes or until pale golden brown at the edges. Let cool on wire racks.
These cookies can be made ahead. According to the original recipe, you can make them a month ahead and store them in airtight containers. I like to freeze my baked cookies.
Sparkling sugar:
I actually found sparkling sugar at Michaels (Wilton brand).
You can also order it from the following places:
King Arthur Flour
Fancy Flours
Great News
If you can't find it, you could sub regular granulated sugar or turbinado.
Reference:
Cardamom Sugar Stars by Alice Medrich. I found this recipe in the December 2007/January 2008 issue of Cooking Pleasures Magazine.
I didn't change anything this time around but I'm interested in trying different extracts (orange or almond? I think either of those would work with the sweet cardamom) or maybe subbing in cinnamon for the cardamom.
Wednesday, December 17, 2008
Double-Chocolate Peppermint Cookies (Vegan!)

These are so festive :) Even though I'll take chocolate-mint anything anytime of year!
These were my first attempt at making vegan cookies. I've made quite a few other vegan sweets but those have all used egg substitutes I was familiar with. These called for a commercial egg replacer so I wasn't sure how they would turn out. It works! They were easy to make and I highly recommend these for any chocoholic, vegan or not. :)
Since they are dairy-free, they are also a good option for lactose-intolerant friends.
I made these as a special treat for my vegan sister and brother-in-law and decided to keep a couple for myself. Well, since I had some of those candy cane Hershey Kisses (bit of an impulse buy at Target last night), I figured I'd try out some thumbprint cookies with them. I have never tried making thumbprint cookies so this was a huge experiment! What do you know? I managed to screw them up a bit! Apparently the vegan baking gods did not appreciate my de-veganizing my cookies - the tops of the Kisses all burned! lol :) They still taste fine and they are just for hubby and myself so it's no big deal. They look really funny, though! Guess I gave myself a bit of bad cookie karma ;)
PS - the dough is also fantastic! And you can eat it since there are no raw eggs or other yuckies
This made 32 cookies
(I used my small cookie scoop - original recipe said it would yield 1 1/2 dozen but I always end up with more vegan goodies than the recipe states..! Nice problem to have, I suppose)
Ingredients:
1 1/2 tsp. Ener-G Egg Replacer (see photo below)
2 tbsp. water
3/4 cup non-hydrogenated, non-dairy butter (I use Earth Balance)
1/2 cup firmly packed light brown sugar (I like the Wholesome Sweeteners sugars since they are organic and fair trade)
1/2 cup granulated sugar (I use evaporated cane juice)
1 tsp. vanilla extract
1/2 tsp. peppermint extract
1 1/2 cups unbleached all-purpose flour
1/4 cup unsweetened cocoa
1 tsp. baking soda
1/4 tsp. salt
1 cup non-dairy chocolate chips (semi-sweet chips are usually OK)
Ener-G Egg Replacer:

Method:
1. Line cookie sheets with parchment paper and pre-heat the oven to 350 degrees.
2. Whisk together the egg replacer and water until it is thick and creamy. Set aside. Mine looked like whisked egg whites when it was ready (frothy). It will thicken up as it sits so don't worry if it seems too runny.
3. Cream the butter, brown sugar, and granulated sugar. Beat in the egg replacer as well as the vanilla and peppermint extracts.
4. In a separate bowl, stir together the flour, cocoa, baking soda, and salt. Add this mixture to the butter mixture. Stir well to combine and then add the chocolate chips. Mix the chips in but do not over-stir.
5. Drop rounded tablespoons of the cookie dough onto a cookie sheet. Do not try to press the blobs of dough down with a fork - it's too sticky and they come out not looking very nice (yes, I tried on one batch!)
Bake for 10-12 minutes.
Remove the cookies from the baking sheet immediately after removing from the oven and place them on a wire rack to cool.
These make great dunkers!
*If you would like to make a non-vegan version of these, simply sub 1 egg for the egg replacer. The butter amount would remain the same so you can sub in salted or unsalted butter as desired. I do recommend you make the vegan ones at least once. You'd never know they're vegan!
I know, I say that every time I post a vegan baking recipe. It's true, though!
Reference: Chocolate Chip Mint Cookies from The Joy of Vegan Baking.
Oops... ;)

Saturday, May 3, 2008
Lemon-Herb Butter Cookies
 These are lovely with some tea and they will make your kitchen smell divine! They are very similar to the lavender shortbread I've made before but I love the addition of the rosemary and lemon - so many great flavours!
I was hoping to make these earlier in the week since I had fresh rosemary from my parents' garden and a local lemon to use but I was unable to find corn flour at the "big box" grocery store. I go to a smaller store on Saturdays to get the bulk of my groceries - they have a wonderful bulk foods section (as well as a bunch of local and organic produce!) so I was able to get the corn flour I needed there. If you can't find it, you should be fine just subbing additional all-purpose flour.
This made 32 cookies - you may or may not get more than that :)
Ingredients:
1 stick unsalted butter, softened
1/4 cup granulated sugar
1 tsp. finely chopped fresh rosemary
1/2 tsp. dried lavender - my addition (I gave mine a quick crush with a mortar and pestle)
1/2 tsp. finely grated lemon zest
2 egg yolks
1 tsp. vanilla extract
1 cup unbleached all-purpose flour
1/3 cup corn flour
1 1/2 tsp. aluminium-free baking powder
1/4 tsp. salt
1/4 cup turbinado (raw) sugar for decorating
Method:
1. Beat the butter, granulated sugar, rosemary, lavender, and lemon zest with an electric mixer or stand mixer for 3 minutes (or until creamy). Beat in the egg yolks and vanilla.
2. Whisk together the flours, baking powder, and salt in a small bowl. Add to the butter mixture and beat until just combined. Shape the dough into 2 1-inch wide logs. Wrap in wax paper and chill for 2 hours.
3. Preheat the oven to 325 degrees. Cover 2 baking sheets with parchment or spray with cooking spray. Place the turbinado sugar in a bowl. Slice the cookies into 1/3-inch thick rounds (work with 1 log at a time - keep remaining dough refrigerated until you're ready to use it). Press one cut side of the cookies into the turbinado sugar and place sugar-side up on a baking sheet. Bake for 12-15 minutes, or until golden brown on bottoms. Transfer to wire racks to cool.

Reference:
This is based on the Lemon-Rosemary Butter Cookies recipe from the April 2008 issue of Vegetarian Times. The only change I made was to add some dried lavender.
Thursday, December 20, 2007
Gingerbread Cookies w/ Fresh Ginger

And here's the other gingerbread recipe. I really think the fresh ginger adds something to them! If you don't have fresh ginger, you can always substitute an additional 1/2 tsp. ground ginger for the 2 tsp. of fresh ginger called for in this recipe.
**Photos coming later on after I have a chance to decorate them!**
I usually get anywhere from 30-45 cookies from this recipe; depending on which cutters I use (I have a small village worth of gingerbread men cutters!)
Ingredients:
2 1/4 cups all-purpose flour
1/4 tsp. salt
3/4 tsp. baking soda
2 tsp. ground ginger
1 1/2 tsp. cinnamon
1/2 tsp. ground allspice
2/3 cup packed brown sugar (I always use light brown sugar; since these also use molasses I don't suppose it matters if you use dark or light sugar)
2/3 cup granulated sugar
1/2 cup unsalted butter, melted, warm
1/4 cup molasses
2 tsp. grated fresh ginger
1 egg
Method:
1. In a medium bowl, combine the flour, salt, baking soda, ground ginger, cinnamon, and allspice. In a large bowl (I used my KA mixer), stir together the brown sugar, butter, molasses, fresh ginger, and egg until well-blended. Slowly stir in the flour mixture until just combined. Form dough into 2 flat rounds. Cover and refrigerate overnight or up to 3 days.
2. Line baking sheets with parchment paper and preheat the oven to 350 degrees F.
3. Lightly sprinkle rolling surface with flour. Roll one dough round to 1/8- to 1/4-inch thickness. Use cookie cutters to cut dough into desired shapes. Remove and reserve dough scraps from around each cookie - you can re-use them! Place cookies at least 1 inch apart on the prepared cookie sheets. Bake 7-9 minutes or until cookies just begin to colour at the edges. Cool completely on a wire rack. Repeat with remaining dough and dough scraps. Cookies can be decorated with frosting, nuts, candies, etc. once they are cooled.

Great Gingerbread Icing Ideas:
*1 cup powdered sugar mixed with 1-2 tbsp. water.
*1 cup powdered sugar combined with 1-2 tbsp. water plus 1/4 tsp. finely grated fresh ginger.
*2 cups powdered sugar, 1 tsp. vanilla extract, 2 tbsp. milk.
*One I haven't tried but it sounds great - mix some melted white chocolate with a little lemon extract. I made a chocolate topping for Grand Marnier cupcakes which used 3 oz. semi-sweet chocolate, coarsely chopped and 1/2 tsp. vegetable shortening. For gingerbread, I'd use 3 oz. white chocolate chopped, 1/2 tsp. veg. shortening, and 1/4-1/2 tsp. lemon extract. Melt the chocolate and shortening in a double-boiler. Place the melted chocolate mix in a large Zip-Lock bag and mix in the extract by squishing the bag. Snip a corner off the bag and use this to decorate the cookies. **You may need to play around with the extract amount - I've never tried this so I honestly wouldn't know how much to use! That amount is just a guess :)
Reference:
This recipe came from the December 2001/January 2002 issue of Cooking Pleasures Magazine. The name of the original recipe was "Golden Gingerbread People." This is also where I got the idea to add fresh ginger to the basic frosting. When I tried that the first time I thought I'd died and gone to heaven! :)
Tips for Rolled Cookies
I know how much of a pest rolled cookies can be so here's a couple tips to help make your life a little easier :)
*Chill the dough for an adequate amount of time. For these sugar cookies, I let mine chill for at least 4 hours. Patience is definitely a virtue when making rolled cookies!
*Keep dough that you are not rolling/cutting in the fridge.
*Flour your work surface, rolling pin, and cutters. You can always gently dust off extra flour using a pastry brush - especially important with darker cookies like gingerbread.
*Work with small pieces of dough at a time.
*Try rolling the dough between two sheets of either wax or parchment paper. You will still need a little flour on the paper but it will prevent the dough from sticking to your counter-tops, rolling pin, or cutting board.
*Remember, they are so worth it when they're all done and decorated! :)
Gingerbread Cookies (w/ Ground Ginger)
I actually have 2 gingerbread cookie recipes that I like - this is the one which does not require fresh ginger.
**Photos coming later after I decorate them!**
This will make a LOT of dough - enough for 30 or so large cookies. You can easily halve the recipe if needed.
Ingredients:
5 cups all-purpose flour
4 tsp. ground ginger
1 tbsp. ground cinnamon
1 tsp. freshly grated nutmeg or 1/2 tsp. ground nutmeg
1/2 tsp. ground cloves
1 tsp. salt
1/2 tsp. baking soda
16 tbsp. (2 sticks) unsalted butter, softened
2/3 cup firmly packed dark brown sugar
2 large eggs
2/3 cup molasses
Method:
1. Combine the flour, spices, salt, and baking soda in a large bowl; stir well to mix.
2. In the bowl of a stand mixer fitted with the paddle attachment, beat together the butter and brown sugar on medium speed until well mixed (about 1 minute). Beat in the eggs, one at a time, beating smooth after each addition. Scrape down the bowl and beater.
**There is no law saying you have to use a stand mixer for this! If you don't have one you can always make these by hand. Goodness knows people have been making cookies since long before KA mixers were invented (I do have to say, mine makes my life so much easier, though!!**
3. Lower the mixer speed and beat in about half the flour mixture. Beat in all the molasses, then scrape the bowl and beater. Add the remaining flour mixture, about a cup at a time, and beat after each addition until it has all been absorbed.
4. Remove the bowl from the mixer and give the dough a final mixing with a large rubber spatula. Scrape half the dough onto a large piece of plastic wrap and press it to about a 1/2-inch thickness. Wrap the dough securely and repeat with the remaining dough. Chill the dough for at least 2 hours or up to 3 days (I always let mine chill overnight).
5. When you are ready to bake the cookies, prepare the cookie sheets by lining them with parchment paper and pre-heat the oven to 350 degrees F.
6. Unwrap one of the pieces of dough and cut it in half. Re-wrap the dough you are not using and return it to the fridge!
7. On a floured surface, roll out the dough to about 1/4-inch thick. Use a floured cookie cutter to cut the cookies. As they are cut, place them on the prepared pans about an inch apart in all directions. Repeat with the remaining dough. Save, press together, and re-roll the dough scraps.
8. Bake the cookies for 12-15 minutes (I only give mine 7-9 since my oven is a bit funny), or until they become dull and dry-looking and feel slightly firm when pressed with a fingertip. Slide the papers onto racks to cool. After the cookies have cooled they can be decorated with icing, candies, nuts, whatever you like.
9. Store cooled cookies between sheets of parchment or wax paper in a tin or plastic container with a tight-fitting lid.
Great Gingerbread Icing Ideas:
*1 cup powdered sugar mixed with 1-2 tbsp. water.
*1 cup powdered sugar combined with 1-2 tbsp. water plus 1/4 tsp. finely grated fresh ginger.
*2 cups powdered sugar, 1 tsp. vanilla extract, 2 tbsp. milk.
*One I haven't tried but it sounds great - mix some melted white chocolate with a little lemon extract. I made a chocolate topping for Grand Marnier cupcakes which used 3 oz. semi-sweet chocolate, coarsely chopped and 1/2 tsp. vegetable shortening. For gingerbread, I'd use 3 oz. white chocolate chopped, 1/2 tsp. veg. shortening, and 1/4-1/2 tsp. lemon extract. Melt the chocolate and shortening in a double-boiler. Place the melted chocolate mix in a large Zip-Lock bag and mix in the extract by squishing the bag. Snip a corner off the bag and use this to decorate the cookies. **You may need to play around with the extract amount - I've never tried this so I honestly wouldn't know how much to use! That amount is just a guess :)
Reference:
This is the "Gingerbread People" recipe from Nick Malgieri's "Cookies Unlimited."
Tips for Rolled Cookies
I know how much of a pest rolled cookies can be so here's a couple tips to help make your life a little easier :)
*Chill the dough for an adequate amount of time. For these sugar cookies, I let mine chill for at least 4 hours. Patience is definitely a virtue when making rolled cookies!
*Keep dough that you are not rolling/cutting in the fridge.
*Flour your work surface, rolling pin, and cutters. You can always gently dust off extra flour using a pastry brush.
*Work with small pieces of dough at a time.
*Try rolling the dough between two sheets of either wax or parchment paper. You will still need a little flour on the paper but it will prevent the dough from sticking to your counter-tops, rolling pin, or cutting board.
*Remember, they are so worth it when they're all done and decorated! :)
Christmas Sugar Cookies
 For these cookies, I used the recipe from Annie's Eats. Since I really didn't change any of the ingredients, I'll just put a link to her post. The only thing I did change was to decrease the oven temperature to 350 degrees but that's just because I have a pretty ancient oven and it seems to do best at 350! :)
Here's the link: Christmas Cookies.
Photos coming later on after I decorate them all tonight!
Frosting:
I use a very basic frosting for sugar cookies.
2 cups powdered sugar
1 tsp. vanilla extract (you could also use almond extract or do 1/2 tsp. vanilla and 1/2 tsp. almond)
2 tbsp. milk
Food colouring
Mix sugar and vanilla extract. Add milk gradually while mixing until icing is a good, slightly stiff, consistency for decorating.
Tips for Rolled Cookies
I know how much of a pest rolled cookies can be so here's a couple tips to help make your life a little easier :)
*Chill the dough for an adequate amount of time. For these sugar cookies, I let mine chill for at least 4 hours. Patience is definitely a virtue when making rolled cookies!
*Keep dough that you are not rolling/cutting in the fridge.
*Flour your work surface, rolling pin, and cutters. You can always gently dust off extra flour using a pastry brush.
*Work with small pieces of dough at a time.
*Try rolling the dough between two sheets of either wax or parchment paper. You will still need a little flour on the paper but it will prevent the dough from sticking to your counter-tops, rolling pin, or cutting board.
*Remember, they are so worth it when they're all done and decorated! :)

Monday, December 10, 2007
Blondies
Confession: I have never even tried a blondie before but have been intrigued, if you will, by them for some time... maybe it's a blond thing? Anyway, I bought a bunch (ie: too many) butterscotch chips over the weekend and needed a way to use them.
I read some blondie recipes thinking they would require butterscotch chips only to find that they all said chocolate chips... well humph! I really wanted to use the butterscotch chips but figured a butterscotch-flavoured bar plus butterscotch chips would be a bit of butterscotch overload (I know, hard to imagine!) So, I sort of adjusted one to use both semi-sweet chocolate chips and some of the butterscotch chips. Here's what I ended up with:
This is enough for an 8- or 9-inch baking pan (mine is 8x8). It will yield about 18 bar cookies. You can double this if needed.
Ingredients:
1 cup packed brown sugar
1/3 cup butter
1 egg
1 tsp. vanilla
1 cup all-purpose flour
1/2 tsp. baking powder
1/8 tsp. baking soda
1/4 cup butterscotch chips
1/4 cup semi-sweet chocolate chips (yeay! Ghiradelli were on sale!)
1/2 cup chopped walnuts
Method:
Preheat oven to 350 degrees F.
1. Grease an 8- or 9-inch baking pan; set aside. In a medium saucepan, heat the brown sugar and butter over medium heat until the sugar dissolves. You will need to stir it constantly. Allow this to cool slightly before adding the egg (you do not want butterscotch scrambled eggs!). Stir in the egg and then add the vanilla. Stir in flour, baking soda, and baking powder but do not over-mix. Fold in the nuts and chips.
2. Spread the batter into the prepared baking pan. Bake in a 350 degree oven for 20-25 minutes (adjust the time to 25-30 if using a larger pan) or until a toothpick inserted in the center comes out clean. Cool slightly on a wire rack. Cut into bars while still slightly warm.
Reference:
I used several recipes to create this one! First, I found blondie recipes in the Better Homes and Gardens New Cook Book as well as Baking Illustrated. I mostly used the BH&G book but consulted the Baking Illustrated to make sure I really didn't have to just sprinkle the nuts and chips on top of the un-baked bar mixture - sure enough, I could mix them in. I also found this recipe on BakingBlonde's Blonde Ambition in the Kitchen blog which suggested using butterscotch chips.
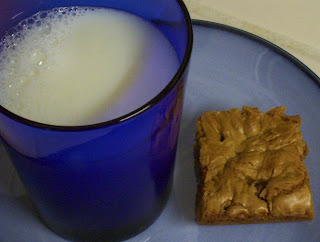
Happiness is a warm cookie and a glass of milk.
Monday, December 3, 2007
Sugar Cookies

I was a busy baking bee last week getting ready for that bridal shower! These were the other cookies I made - I used pink decorative sugar on them to go with the wedding colours.
Ingredients:
2 cups unbleached all-purpose flour
1/2 tsp. aluminium-free baking powder
1/4 tsp. salt
16 tbsp. (2 sticks) unsalted butter, softened
1 cup granulated sugar, plus 1/2 cup for rolling dough
1 tbsp. light brown sugar
1 large egg
1 1/2 tsp. vanilla extract
Colored sugar or edible glitter (optional) for decorating
Method:
1. Preheat the oven to 350 degrees. Line baking sheets with parchment paper.
2. Whisk the flour, baking powder, and salt together in a medium bowl; set aside.
3. Either by hand or with an electric mixer, cream the butter, 1 cup granulated sugar, and the brown sugar at medium speed until light and fluffy, about 3 minutes. Scrape down the sides of the bowl. Add the eggs and vanilla; beat at medium speed until combined, about 30 seconds. Add the dry ingredients and beat at low speed until just combined, about 30 seconds. Scrape down the bowl.
4. Place the 1/2 cup sugar for rolling on a cutting board. Roll a tablespoon of dough into a ball and roll the ball into the sugar then place it on the prepared baking pan. Repeat with the remaining dough. Butter the bottom of a drinking glass and then dip the bottom of the glass in the remaining sugar (or colored sugar). Flatten the dough balls with the bottom of the glass until they are about 3/4 inch thick, dipping the glass in sugar as necessary (every 2-3 cookies).
5. Bake until the cookies are golden brown around the edges and their centers are just set and very lightly colored, about 15 minutes. Cool the cookies on wire racks and store between sheets of wax or parchment paper in an air-tight container.
Reference:
For these cookies, I used the "Soft and Chewy Sugar Cookie" recipe from Baking Illustrated.
Lavender Shortbread Cookies
 Wow, these are cookie heaven! Seriously.. they are really good! These were yet another goodie I made for the bridal shower on Saturday. I actually made these and a batch of regular shortbread (just make this sans lavender).
You can find culinary lavender at natural food stores - check Whole Foods and Jimbo's (I found mine at Jimbo's). I found you can also order it from Penzey's (or just go pick it up if you're lucky enough to live close to one)! If you grow lavender, you can also use it from the garden. Just make sure it is grown organically so you're not adding nasty chemicals to your cookies!
The lavender adds a certain sweetness to the cookies - it works really well with the simple shortbread ingredients - and your kitchen will smell amazing while these bake!
In folklore, lavender has always been linked with love, as has food ;)
Ingredients:
2 1/2 sticks unsalted butter, softened
2/3 cup sugar
3 1/4 cups all-purpose flour
1 tbsp. dried culinary lavender or 2 tbsp. fresh lavender florets
**You may want to try using 1/3 cup granulated sugar and 1/3 cup light brown sugar for these (or regular shortbread) cookies.**
Method:
1. Preheat the oven to 325 degrees. Line 2-3 cookie sheets with parchment paper.
2. In the bowl of a standing electric mixer fitted with the paddle attachment, beat the butter and sugar on medium speed for 5-10 minutes, or until the mixture becomes light in colour and very soft and fluffy.
3. Remove the bowl from the mixer and fold in the flour by hand. The dough will be soft.
4. Place a handful of the dough at a time on a lightly floured work surface. Use a floured rolling pin to press out the dough to about 3/8 inch thick. ***Do not use a lot of flour or your shortbreads will be tough which is absolutely not the effect you want! Shortbreads are known for being light.***
5. Cut out the shortbreads using any shape cookie cutter you like (since these were for a bridal tea party, I used a heart shape). With a spatula, transfer them to the prepared pans, spacing them about 1 1/2 inches apart (they will not spread, but they do puff a little).
6. Continue in this manner until all the dough has been used. Remember to use very little flour when rolling out the dough so your last shortbread will be as tender as the first.
7. Bake for 15-20 minutes until they are just a very pale golden colour. Slide the papers from the pans onto wire racks. Store the cooled cookies between sheets of parchment or wax paper in an air-tight container.
Wonderful with a cup of hot tea!

*Photo of the regular (no lavender) shortbreads I also made*
Reference:
This is based on the "Scottish Shortbread" recipe from Nick Malgieri's Cookies Unlimited book.
Tuesday, November 6, 2007
Just Like Those Girl Scout Cookies...
I love anything citrus-y so when I found this recipe I had to try it! These were really yummy, but with 2.5 g sat fat per cookie (yes, per cookie!), they will be a once-in-a-while treat!
Makes about 4 dozen cookies
Ingredients:
1 cup butter, softened
1 cup powdered sugar plus extra for garnish, divided
1 1/2 tsp. grated lemon peel
1 1/2 tsp. lemon juice
2 1/4 cups unbleached all-purpose flour
1 cup finely chopped almonds
1/4 tsp. salt
Method:
1. Preheat oven to 400 degrees. Beat butter, 1/2 cup of powdered sugar, lemon peel, and lemon juice in a large bowl (or KA mixer) 3 minutes or until soft and creamy.
2. Combine flour, almonds, and salt in a medium bowl. Slowly beat into butter mixture.
3. Drop teaspoon-size rounds of dough onto baking sheets 1 inch apart. Bake 7-9 minutes or until light brown on bottom. Cool 5 minutes. Roll the cookies in 1/2 cup of the powdered sugar while still warm and then cool completely. Sprinkle with additional powdered sugar before serving.
Reference:
I found this in the April/May 2007 issue of Cooking Pleasures magazine.
Thursday, June 21, 2007
Ladies... Start Your Coffee Makers!
Sorry, not a coffee recipe...! It is; however, something wonderful to enjoy with a coffee. The first time I made biscotti I was pleasantly surprised at how easy it was. I had been "scared" of it for years and finally took the plunge. Very tasty. These recipes are from Nick "God of Cookies" Malgieri's book "Cookies Unlimited."
According to the book, the word biscotti means "twice cooked." Just thought I'd throw in a free Italian lesson for you there!
Please by sure to read "Tips for Biscotti" at the bottom of this post.
***Orange and Almond Biscotti***
Just made this today - they are heavenly. So, I hunted high and low (well, 3 grocery stores *including the "ritzy" one near my parents' house, and my mom's cabinets - she has all kinds of weird baking stuff! - I could not find candied orange peel to save my life. :( Oh well, I decided to just get some chunky marmalade and dig the bits of orange peel out of that.. almost the same thing! We'll see how it works... It works! I ended up using a bit less than 2/3 of a cup with the marmalade - really great!
I bet this would be amazing with a nice iced coffee - nothing fancy; just strong brewed coffee with some milk/cream poured over ice. Nice summery coffee break.
 **Probably should have taken that broken one out of the photo! lol... these were so delicious - nice and light and quite tender for a biscotti. The marmalade worked wonderfully!**
Ingredients:
1 3/4 cups unbleached all-purpose flour
3/4 cup sugar
1 tsp. aluminium-free baking powder
1/4 tsp. salt
1 stick unsalted butter
1 cup whole blanched almonds, coarsely chopped
2/3 cup candied orange peel, cut into 1/4 inch diced pieces (see note above - I subbed 1/3 cup plus about another 1/6 of a cup of orange marmalade. I just did my best at pulling out the pieces of orange peel. Worked really well!)
2 large eggs
2 tsp. vanilla extract
Finely grated zest of 1 large orange
Method:
1. Prepare pans by covering 2 cookie sheets with parchment paper or foil (or use a silicone baking mat).
2. Set a rack in the middle level of the oven and preheat to 350 degrees.
3. In a bowl, combine the flour, sugar, baking powder, and salt; stir well to mix.
4. Cut the butter into six or eight pieces and add to the bowl. Rub the butter into the dry ingredients. Reach down to the bottom of the bowl and make sure no dry ingredients "escape" the butter (what is this? Alcatraz?!) Rub and distribute the butter evenly until there are no longer any large pieces of butter and the mixture is cool and powdery.
5. Add the almonds and orange peel to the flour and butter mixture and toss to combine.
6. In another bowl, whisk together the eggs, vanilla, and orange zest and add the dry ingredients. Use a large rubber spatula to stir the ingredients together until they form a dough.
7. Scrape the dough onto a floured surface and press it together. Shape the dough into a 12-inch cylinder and divide it in half. Roll each half under your hands to re-form it as a thinner 12-inch cylinder. Place the logs on one of the prepared pans, not too close to each other or to the sides of the pan. Use the palm of your hand to gently flatten the logs.
8. Bake the logs for 25-30 minutes or until they are well-risen, well-coloured, and firm when pressed with a fingertip. Place the pan on a rack to cool.
9. Reset the racks in the upper and lower thirds of the oven but leave the temperature at 350 degrees. Place each of the cooled logs on a cutting board and slice them diagonally every 1/3 inch. Arrange the biscotti on the prepared pans, cut side down. You don't need to leave space between them - they will not spread. Bake the biscotti for 15-20 minutes or until they are well toasted. Cool on the pan on a rack.
10. Store the biscotti between sheets of parchment or wax paper in a tin or plastic container with a tight-fitting cover.
***Classic Tuscan Biscotti a.k.a. Cantuccini***
This will make 60 biscotti.
Ingredients:
2 cups unbleached all-purpose flour
3/4 cup sugar
1 1/2 tsp. aluminium-free baking powder
1/2 tsp. ground cinnamon
1 1/2 cups whole unblanched almonds
3 large eggs
2 tbsp. vanilla extract
Method:
1. Prepare pans by covering 2 cookie sheets with parchment paper or foil (or use a silicone baking mat).
2. Set a rack in the middle level of the oven and preheat to 350 degrees.
3. In a bowl, combine the flour, baking powder, sugar, and cinnamon; stir well to mix it all together. Stir in the almonds.
4. In another bowl, whisk the eggs with the vanilla. Use a rubber spatula to stir the eggs into the dry ingredients. Continue to stir until a stiff dough forms.
5. Scrape the dough out onto a lightly floured work surface and divide it in half. Roll each half under the palms of your hands into a cylinder a little shorter than the baking sheet. Place the logs of dough onto the baking sheet, making sure they are not too close to each other or to the sides of the pan. Press down gently with the palm of your hand to flatten the logs.
6. Bake for about 25-30 minutes, or until the logs are well-risen and have also spread to about double their original size. The logs are done if they feel firm when pressed with a fingertip. Place the pan on a rack and let the logs cool completely.
7. Reset the racks in the upper and lower thirds of the oven but leave the temperature at 350 degrees. Place each of the cooled logs on a cutting board and cut diagonally into 1/3 inch-thick slices. Arrange the biscotti on the prepared pans, cut side down. You don't need to leave space between them - they will not spread any more. Bake for 15-20 minutes or until they are well-toasted. Cool the pan on a rack.
8. Store the biscotti between sheets of parchment or wax paper in a tin or plastic container with a tight-fitting cover.
***Chocolate Chunk Biscotti***
Makes about 60 bisotti
Ingredients:
1 3/4 cups unbleached all-purpose flour
2/3 cup unsweetened cocoa powder, sifted after measuring
2 tsp. aluminium-free baking powder
Pinch of salt
1 1/4 cups sugar
6 ounces semi-sweet chocolate, cut into 1/4-inch pieces
6 ounces milk chocolate, cut into 1/4-inch pieces
4 large eggs
1 tsp. vanilla extract
Method:
1. Prepare pans by covering 2 cookie sheets with parchment paper or foil (or use a silicone baking mat).
2. Set a rack in the middle level of the oven and preheat to 325 degrees.
3. In a bowl, combine the flour, cocoa, baking powder, and salt; stir well to mix. Stir in the sugar and chocolates.
4. In another bowl, whisk together the eggs and vanilla and using a large rubber spatula stir the eggs into the flour mixture to form a dough.
5. On a lightly floured surface, press the dough together - it will be sticky. Flour your hands and the surface lightly, but do not add any more flour to the dough. Divide the dough in half and roll each half into a log the length of your pan. Place the logs on a pan, making sure they are not too close to each other or to the sides of the pan. Press down lightly with the palm of your hand to flatten the logs (use a dry brush to remove excess flour if necessary). Bake for about 30 minutes, until the logs are well-risen and have also spread to about double in size. The logs are done when they feel firm when pressed with a fingertip. Cool the logs on the pan.
6. Reset the racks in the upper and lower thirds of the oven. Using a sharp serrated knife, slice the baked logs diagonally about every 1/4 to 1/2 inch. Return the biscotti to the pans, cut side down, and bake in the 325 degree oven for 15-20 minutes or until they are dry and crisp. Cool on a wire rack.
7. Store the biscotti between sheets of parchment or wax paper in a tin or plastic container with a tight-fitting cover.
***Tips for Biscotti***
These were some handy hints and tips I read in the "Cookies Unlimited" book. Useful for those trying biscotti for the first time.
*If the dough seems soft, it is correct. Do not add extra flour to the biscotti doughs or your resulting cookies will be cement-like (not exactly the effect we're shooting for here!)
*If you need to flour the work surface to handle the dough more easily, do so. When the dough is safely on the pan just brush off the excess flour with a dry pastry brush.
*Make sure you bake the biscotti enough the first time around. If the centers of the logs are not baked through, they will compress when you slice them (sink like a souffle) and harden during the second baking (there's those cement cookies again!)
*Use a really sharp knife to slice the biscotti. Cutting with a dull knife will make the log shatter.
*The thinner you slice the biscotti, the more pan room you will need for the second baking. Malgieri suggests one cookie sheet per log of biscotti.
*Watch the biscotti carefully during the second baking. Most biscotti have a fairly high sugar content and will burn easily if left unattended.
*Cool biscotti on their pans - the extra bit of drying time will make them even crisper (this is what you want for a "dunking" cookie).
*Biscotti are the perfect "keeping cookie" - just be sure to store them in airtight containers and away from humidity.
Reference for recipes and "Tips for Biscotti" section:
Malgieri, Nick (2000). Cookies Unlimited. HarperCollins Publishers, Inc.: New York, NY.
Thursday, May 31, 2007
To-Die-For Chocolate Chip Cookies

These are simply amazing... they never last long when I make them! I got the recipe from the book "Cookies Unlimited" by Nick Malgieri (he is the god of cookies!) I like to mix up the chips, using half and half milk chocolate and semisweet chocolate. If you like, you could do half butterscotch and half semisweet or half white choc and half semisweet. Whatever you like :)
You can also halve the weight of the chips and only put 1 cup/1/2 a bag in... but where's the fun in that?! :)
Here's the recipe; it will make about 35 cookies.
Ingredients:
1 1/4 cups all-purpose flour
1/2 tsp. salt
1/2 tsp. baking soda
1 tsp. cinnamon (not in the original recipe so if you're not a fan, you can totally leave it out. I will add cinnamon to everything! Just adds a little extra to the cookies).
8 tbsp. (1 stick) unsalted butter, softened (throw it in the microwave for about 25-30 seconds to soften it)
1/2 cup firmly packed light brown sugar
1/4 cup granulated sugar
1 large egg
1 tsp. vanilla extract
2 cups (one 12-ounce bag) semisweet chocolate chips
**You can also add 3/4 cup chopped walnuts or pecans if you would like. I have never tried this, but I do like nuts and chocolate together in cookies. This particular cookie is just so good without them - I figure why fix what's not broken?!**
:)
Method:
1. Preheat oven to 375 degrees. Line 2-3 cookie sheets with parchment, foil, or a silicone baking mat (I'm a tree hugger so I save paper and use the baking mats!)
2. In a bowl, combine the flour, salt, cinnamon (optional), and baking soda; stir well to mix.
3. In the bowl of a standing electric mixer fitted with the paddle attachment, beat together the butter, brown sugar, and granulated sugar until combined, then beat in the egg and vanilla, beating until smooth. Do not overmix.
4. Remove the bowl from the mixer and use to large rubber spatula to stir in the flour mixture. Stir in the chips and optional nuts.
5. Drop teaspoonfuls of the dough 2-3 inches apart on the prepared pans. Bake the cookies for 12-15 minutes (that is according to the recipe - mine only ever need 10 minutes. I'd recommend you check them after 10!), or until they are deep gold and firm.
6. Slide the papers or foil or baking mats off the pans onto racks. After the cookies have cooled, detach them from the paper/foil/mats and store them between sheets of parchment or wax paper in a tin or plastic container with a tight-fitting cover.

Reference:
Malgieri, Nick (2000). Cookies Unlimited. HarperCollins Publishers, Inc.: New York, NY.
Monday, May 21, 2007
Chewy Oatmeal Cookies

These are some of my favorite cookies! They taste very similar to one of those chewy granola bars which only pass for "healthy" because they have granola in the name...! There are so many combinations of goodies that you can use for this recipe - be sure to check out the modifications section at the bottom. The first recipe is for my favorite way to make them - Oatmeal, chocolate chips, dried cranberries, and walnuts.
This will make about 60 cookies (I usually half the recipe. However; they can be frozen so feel free to make them all!)
Ingredients
2 cups all-purpose flour
1 tsp. baking powder
1 tsp. salt
2 cups rolled oats (regular oatmeal)
1 tsp. cinnamon
16 tbsp. (2 sticks) unsalted butter, softened
1 cup granulated sugar
1 cup firmly packed dark brown sugar (you can use light brown sugar if necessary)
2 large eggs
1 tsp. vanilla extract
1 1/2 cups dried cranberries
4 ounces (about 1 cup) coarsely chopped walnut pieces
1 cup (1 6-oz bag) semisweet chocolate chips
3 or 4 cookie sheets or jelly roll pans covered with parchment paper or foil (or one of those silicone baking mats - not sure how I lived without mine!)
Method:
1. Preheat oven to 350 degrees.
2. In a large bowl, combine the flour, baking powder, salt, oatmeal, and cinnamon. Stir to mix well.
3. In the bowl of a standing electric mixer fitted with the paddle attachment, beat together the butter, granulated sugar, and brown sugar until well mixed, about a minute. Beat in the eggs one at a time, beating until smooth after each addition, then beat in the vanilla.
4. Lower the mixer speed and beat in the flour and oatmeal mixture, then add the raisins, nuts, and chips. I also like to give it a final mix by hand.
5. Drop teaspoons of the batter about 3-4 inches apart (they really don't spread much) on the prepared pans. Flatten the mounds with the back of a fork.
6. Bake the cookies for 12-13 minutes (the original recipe says 15-20; I only give mine 12-13... be sure to check on them!) or until they spread and color evenly and become firm.
7. Slide the papers off the pans onto racks.
8. After the cookies have cooled, detach them from the paper and store them between sheets of parchment or wax paper in a plastic container with a tight-fitting cover. If you'd like to freeze them, just place them in freezer-safe zipper bags, remove the air, and seal tightly.
Modifications:
*My husband does not really care for dried fruit or nuts in cookies so I just make oatmeal-chocolate chip for him. If you want to make 60 of these cookies, just make sure you add a total of 3 1/2 cups of chocolate chips. The rest of the above ingredients remain the same. For 30 cookies (I usually make 30 of his and 30 of the above recipe), you will need 1 3/4 cups of the chips. Half the rest of the above ingredients. You can also use these to make a plain oatmeal-raisin cookie.
*Try substituting pecans for the walnuts. I've also thought about trying almonds in these.
*Instead of the dried cranberries, you can use dark raisins or golden raisins. The fruit is really a preference thing. I think the cranberries add a nice tang which balances well with all the sweet flavors. You could even mix 1/2 cranberries and 1/2 raisins.
*Really, you can use any combination of raisins/cranberries, chocolate chips, and nuts. If you are making 60 cookies, just be sure to add in 3 1/2 cups total of the chips/fruits/nuts. For 30 cookies, use 1 3/4 cups (I like to use 1/2 cup nuts, 1/2 cup cranberries/raisins, and 5/8 cup chocolate chips - that's 1/2 + 1/8 cup for those of you who don't like math!)
*Be creative and try your own combinations! :)
Reference:
Another great one from Nick Malgieri!
Malgieri, Nick (2000). Cookies Unlimited. HarperCollins Publishers, Inc.: New York, NY.
Subscribe to:
Posts (Atom)